I think traditional crazy quilts are made on a foundation fabric. I tried that method and found it restrictive. First, I’ll say I’m not an expert. I just experimented one day and this is what I came up with and what I learned.
A couple of things…
1. Use ¼ inch seams and trim edges straight with the rotary cutter before you sew.
2. Press the seams open. My blocks have some BIG lumpy areas because I pressed the seams to one side. Pressing the seams open is slower and a bit finicky, but your blocks will be much flatter in the end.
3. Be careful when joining small sections to make larger sections. Try to make the seams where you join pieces at irregular angles. If everything is joined with all vertical or all horizontal seams, your block won’t look crazy.
4. If you want to disguise where your sections are joined, try to line up similar fabrics or colors. This will help make the seams disappear. I tried to show this in the tutorial.
4. Don’t be afraid to cut sections apart. Cutting sections multiple times is a good way to get small pieces and interesting shapes.
5. When I made the block for the tutorial I started with a finished block size in mind. This block finished at 6.5 inches. It helps to lay sections on your cutting mat as you work to do a quick measure and see where sections need to be added to get to your finished block size.
6. I used vintage fabric squares for both the Vintage Windows quilt and for the block in this tutorial. They were approximately 3” by 3” squares. This is a great project for your scraps. Variety in color and scale of prints will help the pieces pop.
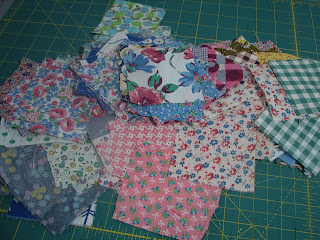
Start with a good variety of fabric scraps. This is another $1.00 bag of vintage squares.

Start combining pieces of fabric. There are several ways to do this to give a variety of sections that will then be sewn together.
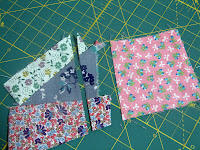
Make 2 or 4 patches and cut them apart in different ways. Offset the four patch (so the seams don’t line up purposely!) and this will provide more variety.

Cut individual pieces in a variety of ways.

Sew two pieces together. Press seam open. Trim a straight edge and attach another piece. Press seam open. Continue this process until you have a small section.

Continue adding individual pieces or pieced segments. Be sure to cut a straight edge with your rotary cutter for each addition. I like to make 10 to 15 different 3 to 5 piece sections with different fabrics so I have lots of choices as I make additions to the sections.


You should end up with small sections that look something like this. I think these should be joined together.

Trim a straight edge on each section. Sew and press the seam open.

Here is what it will look like. I would probably sew the next section at an angle on the upper right of this piece so that the two seams would be at differing angles.

Continue to make more sections and join them together.

Notice in these pictures that the magenta fabric will be partially lined up when these are joined together. This will help camouflage the seam. You don’t have to worry about this if you don’t want to. If you keep your sections small and don’t join with very long seams, they won’t be noticeable.


When your joined sections are large enough, use your rotary cutter to trim the block to your desired size. Oops, not quite big enough. I need to add one more piece!

Here is the finished block.

Guess what you do with these? These are the seeds for another block. Can you see your blocks sprouting? Be sure not to throw out small sections that are cut off when you cut to get straight edges. Many of those are large enough to add into a block. Have fun and get crazy! Any questions or instructions that aren’t clear, just email and I’ll try my best to explain. I'd love to see the blocks and/or the quilts you make using this tutorial. Be sure to let me know!

20 comments:
Uh oh. I'm getting ideas for another quilt - thanks for sharing!!
Kris
Great tutorial! Thanks.
- Jen
I love the "Windows" design. Thanks for the tutorial, too. And thanks for your comment on my blog.
This method looks fabulous and easy. Right up my alley. I am being very good about using scraps lately. My newest quilt idea ( I only have one block done) is based off of your vintage crazy square quilt blocks. I can't wait to show you.
THIS is my kind of piecing!!! Thanks for the clear tutorial, Jacquie! Your idea may just get me sewing!
Thank you for sharing this tutorial! I think it's great and want to give it a try.
I love the fabrics!
Deb
Awesome tutorial! LOVE using scraps to make blocks!
What fun! How freeing and ispiring this idea is. Makes you want to start a box to save all those small cut pieces from other projects to make crazy patch windows. Thanks!
I have a box full of little scraps and only use them for applique - thus the box is always overflowing. This is the PERFECT method to get rid of them! Thanks for sharing it with us.
Jacquie! Why did you have to go and make this so pretty? I'm far too impatient to do the fussy pressing but I really, really like these blocks.
What a cool idea! And soooo many possibilities... thanks!
wow this is so awesome. i can't wait to try it! thanks for the great photo tutorial :)
Great tutorial! I am going to have to try it.
Oh my goodness, I *just* noticed this tutorial on your blog.....now I'll NEVER be able to get rid of any of the scraps I'm accumulating, b/c I have such great inspiration & instruction on what to do with them!
Hi Jackie , I,m cottonreel, this is excellent, I do quite a bit of crazy but I have never done it this way. Like all p/qu, I have some spare blocks , I,m off to my sewing room to do this beore I forget.I shall put you on my post so I remember to visit you often.
Fabulous tutorial -- makes the process seem so much easier than other explanations I've read. Thank you so much!!!
I love it!!!!!!! That looks just awesome! Thanks for sharing.
They're wonderful. I will try to do this as well. thank you :)
Oh such a great tut! I am lucky enough to have a few of my great grandmothers crazy quilts. She always told me it's not finished till it has a spider embroidered in it somewhere. Soooo don't forget to embroider your spider��
Hi Jacquie!
Thanks so much for posting this tutorial. I took your classes when you visited the Village Quilters in TN in November and this tute helps reinforce some of the things you taught then.
Jaylene
Post a Comment