
I decided to make these into pillows instead of potholders. I'm not sure I could see a grease stain on these. With pillows I can take them out once a year and they'll last a long time. So many of you asked how I made these, so I put together a brief tutorial. Start with a really cute picture that your children have drawn for you. The first step is to transfer the essence of the drawing into a simple line drawing.
I used my studio window as a light box and taped the drawings to the window, put paper over them and traced. You might be able to use a copier too. I added little details like the belt, mittens and buckle free hand. I just traced the outline to get me started, but you can trace it all if that works best for you.
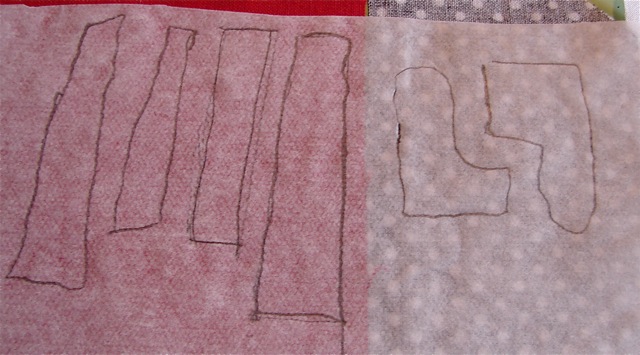
 Now, go to your copy machine and make several copies of this drawing. Cut out the shapes that are in the drawing. Be sure to extend the legs and arms (those will tuck under the body).
 When you have your paper patterns cut, you may want to mark them with an "X" on the right side. This will prevent you from cutting parts upside down.
 Prepare your fabrics with fusible web following manufacturer's directions. I use heat and bond light. Trace your patterns onto the paper side of the fusible. Be sure to put the "X" sides down when you trace.
 The next step is to prepare your background. I used some recycled linen. Your background will need to be stabilized, or when you do your raw edge applique stitching, your piece will pucker. I use a lightweight fusible stabilizer. I iron it to the back of my fabric and then I have a nice stable surface for stitching.
 Place your pattern pieces in the correct positions. Use the original drawing as a guide. When you are satisfied with the placement, fuse in place. I usually do this work on my pressing board, so there is no moving involved.
 Now it's time to add the life to your piece. This is done by stitching around the pattern pieces with black thread. I stitch as close to the edge as possible. Don't worry about retracing your thread. This is a child's drawing. A little whimsy is a good thing. I usually have to do a lot of stopping and starting with a piece like this.
 If you want to emphasize something, stitch over a line a couple of times. I did that on the arms and hands on this one. Add the eyes or other details with French knots or other embroidery stitches. I did the letters by machine. Go slow and easy on curves and leave your needle down and adjust every couple of stitches.
 I added borders and quilted them to make pillow tops. These are 14" pillows. I think I'm going to give these to my mom and make another set for myself. I'd like them a little bigger. A couple of hours and you've got a quilty memory. I think they'll make a great Christmas gift!
25 comments:
What a wonderful way to preserve your child's drawing and make them feel VERY special indeed!! I have a 2 1/2 yr old that this would be perfect for:) Thanks!
Awe. Those are great! I LOVE kid-art. Great idea.
These are so adorable, what a great idea! I have so many cute drawings from my sons... and more everyday. Also a great gift for their teachers! Thank you so much!
these are SOOOO cute! :) and i know little ones would be delighted to see their art on display.
Sooo cute. I might give these a try this year.
What a wonderful idea !!! What awesome gifts . This is a must do :)
These are so cute. Thanks for sharing your process.
So cute! I once (as in 10 years ago) made pillowcases out of my son's drawings of a snowman and Santa and they turned out cute too.
These are adorable! I am definitely bookmarking this idea for later on when I have drawings to use. It would be so cute in their own room on their bed, too. Love, love, love these!
Auw...so cute!! Marking this for later project. Should try because I've never given a try on an applique!
What a beautiful idea! So often I would leave a comment here in this blog - you inspired me in beginning quilting and patchworking. Today I want to say thank you for all your knowledge you spent to all of us 'Newbies'. Sorry about my English - learning at school is many years ago - but I think you'll understand what I'm trying to say.
Now its time to go to my children and ask them for a drawing...
best wishes from good old Germany - Gabi
Such a cute idea! I just need kids to make cute drawings for me now. :)
Great tutorial - I can't wait to get going with this idea!
That idea is so dang cute! What a great way to preserve a child's artwork. Nice job!
Thanks for the tutorial! SO cute!
What a great idea. I wish I had thought of something like that when my children were children.
LOVE, LOVE, LOVE!!!
Thanks for sharing this tutorial Jacquie! I can't wait to try it.
Oh these are adorable.
Thanks for showing us the steps.
I'm so glad you made pillows instead of potholders - great idea!
oh my gosh so so incredibly cute.
do u free-motion when u are sewing the designs down.
Love this idea! Can't wait to give it a try. :)
You are the BEST! I have had a reindeer hanging for YEARS that my daughter made with her little hands being the antlers. I FINALLY took it down after noticing 'irish lace' hanging on it and some prodding from my daughter. Of course, the minute it was down she wanted to know if I was going to throw it away...I think I'll make her a pillow for Christmas using your great idea! Thanx! Sheer genius you are!
cute but that's a lot of work!
Thanks SO much for this tutorial! I'd love to preserve my kids' artwork this way. I love it!
Wow! Such a great idea. My kids are grown now but i have tons of granchildren to ask to draw for me.
Post a Comment